


- Messages
- 2,294
So by request *coughalexiscough* I made a tutorial for you all to see and hopefully have a shot at  I've never done one before so if there's anything wrong with it or you can't understand anything, don't be afraid to speak up
I use Gimp, which I imagine is similar enough to Photoshop that you can translate this tut but if not you can always download Gimp free off the internet
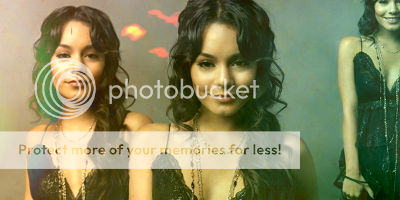
Anyway, I wanted to start with an easy-ish one, so this is the image we will be making

[ul]
[li]First create your blended image. Have a go at playing around with the images, varying their size and positions instead of the standard. Sharpening and upping the contrast on your images also adds to the final result (Filters>Enhance>Sharpen) [sub]set to 10 or 12[/sub]
Note: This banner works best with plain white or light coloured backdrops, so try choosing a shoot like that for your subject. Most celebrities should have them in their galleries, so it shouldn't be too hard to find.
TIP-- When you initially create your blend try layering the images with different modes, such as darken. It's what I do because I get so frustrated with the clipping/erasing tool XD </LI>
[li]Next step is to colour the blend.
Note: This colouring covers a broad range of images, but if it doesn't suit simply fiddle with the values a bit.
[li]Create a new layer (Layer>New layer). In the layers box (Ctrl+L if it is not there) Set the mode to Grain Merge and the opacity to 37.6
[li]Copy this image into the layer (scale it down if you want to get all the colours) and once you are happy, anchor it (Ctrl+H)
[li]Create a new layer, but set this one to Darken Only. 100% opacity.
[li]Copy this image into the layer. Then (Colours>Invert). Scale the image if need be and erase any obstructing marks from the subject's face, then anchor.
[li]Create a new layer, Lighten Only, and copy this image into it. Flip the image so that the flat half of the circle is on top and position it so the light reaches one-third to halfway up the blend. Scale if needed and anchor.
[li]New layer, Darken Only 100%. (We're getting there, I promise! )Place this image down the bottom (as this is where your text will ideally go and, yes, you guessed it, scale & anchor.
[li]New layer (last one!), Lighten Only, 100% with this image and you should know the drill by now.
<LI>[li]Add your text, save as <titlehere>.PNG and voila!
[/li][/ul]
Phew, and that was one of the simple ones)")
DON'T FORGET you don't have to follow my exact instructions, play around with the opacities and the modes, as well as brightness levels, saturation and all that. Don't be afraid to experiment because the undo button is always handy and I've found with GIMP that it's a good idea to constantly save your work (that's what you get for free programs )
)
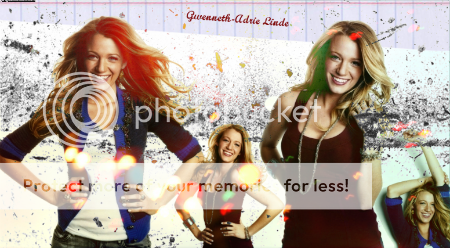
I'd love to see what you can all come up with So if you make something, post it here!
Enjoy, Em")
Also, if you want a tutorial for any of my other banners just ask and I'll post one up
I've never done one before so if there's anything wrong with it or you can't understand anything, don't be afraid to speak up I use Gimp, which I imagine is similar enough to Photoshop that you can translate this tut but if not you can always download Gimp free off the internet
Anyway, I wanted to start with an easy-ish one, so this is the image we will be making
[ul]
[li]First create your blended image. Have a go at playing around with the images, varying their size and positions instead of the standard. Sharpening and upping the contrast on your images also adds to the final result (Filters>Enhance>Sharpen) [sub]set to 10 or 12[/sub]
Note: This banner works best with plain white or light coloured backdrops, so try choosing a shoot like that for your subject. Most celebrities should have them in their galleries, so it shouldn't be too hard to find.
TIP-- When you initially create your blend try layering the images with different modes, such as darken. It's what I do because I get so frustrated with the clipping/erasing tool XD </LI>
[li]Next step is to colour the blend.
(Colours>Components>Channel mixer)
Red
R: 87.4
G: 7.4
B: -13.3
Green and blue channels unaltered. Preserve Luminosity unchecked
Press okay and exit and then enter back into the channel mixer (you may have to press Reset) to enter these values:
Red
R: 108
G: 10.4
B: -31.3
Green
R: -1.5
G: 99.3
B: -1.5
Blue
R: 4.4
G: -43
B: 78.5
Preserve Luminosity checked
Red
R: 87.4
G: 7.4
B: -13.3
Green and blue channels unaltered. Preserve Luminosity unchecked
Press okay and exit and then enter back into the channel mixer (you may have to press Reset) to enter these values:
Red
R: 108
G: 10.4
B: -31.3
Green
R: -1.5
G: 99.3
B: -1.5
Blue
R: 4.4
G: -43
B: 78.5
Preserve Luminosity checked
[li]Create a new layer (Layer>New layer). In the layers box (Ctrl+L if it is not there) Set the mode to Grain Merge and the opacity to 37.6
[li]Copy this image into the layer (scale it down if you want to get all the colours) and once you are happy, anchor it (Ctrl+H)
[li]Create a new layer, but set this one to Darken Only. 100% opacity.
[li]Copy this image into the layer. Then (Colours>Invert). Scale the image if need be and erase any obstructing marks from the subject's face, then anchor.
[li]Create a new layer, Lighten Only, and copy this image into it. Flip the image so that the flat half of the circle is on top and position it so the light reaches one-third to halfway up the blend. Scale if needed and anchor.
[li]New layer, Darken Only 100%. (We're getting there, I promise!
)Place this image down the bottom (as this is where your text will ideally go and, yes, you guessed it, scale & anchor.[li]New layer (last one!), Lighten Only, 100% with this image and you should know the drill by now.
<LI>[li]Add your text, save as <titlehere>.PNG and voila!
[/li][/ul]
Phew, and that was one of the simple ones
DON'T FORGET you don't have to follow my exact instructions, play around with the opacities and the modes, as well as brightness levels, saturation and all that. Don't be afraid to experiment because the undo button is always handy and I've found with GIMP that it's a good idea to constantly save your work (that's what you get for free programs
)I'd love to see what you can all come up with
So if you make something, post it here!Enjoy, Em
Also, if you want a tutorial for any of my other banners just ask and I'll post one up


 ) because it looks very nice
  Good job.

")

 I have only just got GIMP and have been trying out certain tutorials.... but this one was the best so far.... and im not just saying that