Claire's Banner Examples

Monty Pendleton

💡 Inventor | Guardian 💡
 
Messages
10,413
OOC First Name
Claire
Blood Status
Muggleborn
Relationship Status
Single
Sexual Orientation
Asexual
Wand
Straight 9 1/2 Inch Rigid Walnut Wand with Thestral Tail Hair Core
Age
1/1999 (61)
giphy.gif

claire's banner examples
just some examples of my work!

zY4dlV3.png


aSdfdya.png


0yFuu49.png


GO7eW5Y.png


rmgzXoP.png


Zd1V0Vy.png


0n1ANmC.png


VTy0vkP.png


qmiDPrv.png


ZnhCnwu.png


rqw1nzU.png


b27f8ND.png


JX408h3.png


QUyDI4Z.png


POevLCr.png


3GSYd2V.png


UrrG9cF.png


xYYldVZ.png


TKO1keF.png


lNlSaC6.png


YEbmvXn.png


VVjjEkD.png


CBWPKZi.png


DeHxyI2.png


5LeU23b.png


lOb7vvQ.png


99WrF5H.png


tsdxLQr.png


iPrbhbp.png


hKaTqvQ.png


ixCosUv.png


6RBi87b.png


fyn3QuK.png


81hCW2c.png


GfCdfd8.png


4iBSDle.png


CtWDvtW.png

4wNC35f.png
mwzd69.jpg


119ttlu.jpg


4zupo1.jpg


2qu84xv.jpg


ddhv0o.jpg


2lswkuv.jpg


n6x15z.jpg


bi6jkp.png


160r38i.png


25k7acj.png


2hdyvr9.png


zk5vyg.png


m8nub8.png


2iaar1t.png


2dkz2ty.png


6i9n3c.png


k1dnhv.png


nq3382.png


giphy.gif

signature tutorials
these tutorials are for photoshop, but may be translatable

Helloo there! For my first tutorial I'm going to show you how to make this banner here:

fyn3QuK.png


Making this signature will require some knowledge of photoshop, such as layers, layer modes, and colouring PSDs, but if you're confused about anything there are tutorials out there online to help. I might make general photoshop tutorials in future for the basic tools, but not right now.

Resources used:

Model image | Texture 1
Texture 2 | Texture 3 | Leaves | Leaves 2 | Constellation
Mirror | Tiles | Lighting 1 | Lighting 2

credit for the images above goes to the owners... unfortunately, I can't track them all down now


Step One

Open a new 500x200 canvas with a white background. Add texture 1 and position it like so:

eepxCEt.png


Step Two

Add texture 2 and set the mode to screen. Add texture 3 and set the mode to multiply.

bRFAaTp.png


Step Three

Add the tiles and resize as shown below to fit image. Add model over the top of the tiles.

nTO2dcE.png


Step Four

Add and resize the mirror, placing it so that it half obscures the model's face. Create a new layer beneath the mirror and paint the area inside it white. Then lower the opacity of this white layer to around 70%.

6h1AWzp.png


Step Five

Add leaves 1, resize, and position behind the mirror, obscuring more of the background model's face so that only one of her eyes is visible. Duplicate your model layer and resize it, placing it over the mirror.

qRK2DWW.png


Step Six

Add leaves 2, resize, and place behind the smaller model. I also added leaves 1 again and placed it in the very lower foreground, so that the smaller model looks as if she is behind the leaves.

zWPbpeP.png


Step Seven

Add lighting 1, set the mode to soft light, and reduce the opacity to 30%. Add lighting 2, set the mode to overlay,
and position until you are happy with the way it looks. Finally, add the constellation, set mode to lighten, and position it if you can so that one of the lines cuts through the background model's eye. This will help draw the focus to the smaller model in the foreground.

sEanmu8.png


Colouring & Text

To colour, I placed the PSDs Porcelain Doll and White Lies from Evey's Play Pretend pack over the top of the entire image. I also used Take Me to Church, but placed this PSD just above texture 3. Finally, on top of the whole image, I added a curves adjustment, set to input 106, output 134. You can add the text as you like!

fyn3QuK.png


Aand you're done! This was my first tutorial, so I apologise if it's not the easiest to follow. I'll try to get better at explaining things in future! You are welcome to use this tutorial (or parts of it) to make and use a signature for yourself if you would like to, using your own model!


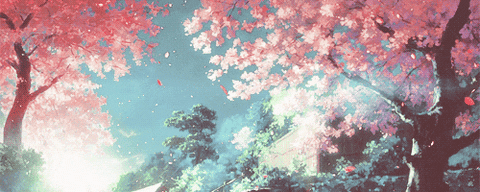
Hi again! The banner I'm going to be showing you how to make today is this one here:

Zd1V0Vy.png


I want you in advance that it's quite image-heavy. But as always you're welcome just to take inspiration from it, or modify it in any way you wish to make your own banners.

Resources Used

Model 1 | Model 2 | Stock 1 | Stock 2 | Stock 3
Stock 4 | Stock 5 | Stock 6 | Stock 7 | Stock 8
Lighting 1 | Lighting 2 | Roses PNG | Lantern PNG

Resource credits: Models from the Behance pack by dylanasaurus; stocks from We<3It; PNGs by Evey.


Step One

Begin with a 500x200 canvas filled with #2b2323. Add, resize, and cut out your models, placing them on the canvas like so.

tctdsVz.png


Step Two

Add stock 1, resize, and use a soft, low-opacity brush (I go for about 15% opacity) to erase the edges. Do the same thing for stock 2, and you should have something that looks like this.

umTsS2M.png


Step Three

Add stock 3, resize, and set the layer mode to multiply. I also rotated the stock to better cover up the straight edge on the right-hand model. Add stock 4, resize, and use a soft, low-opacity brush to erase the edges.

xE5apGE.png


Step Four

Place down stock 5, set the layer to lighten, and position. Add stock 6, set the layer to lighten, and position.

vKOPEKy.png


Step Five

Add stock 7, resize, and use a soft, low-opacity brush to erase any sharp edges. Add stock 8, set the mode to lighten, and place behind the left-hand model. If necessary, erase edges with soft brush (yay, we're finally done with stocks!).

Bn19not.png


Lighting

Place lighting 1, ensuring the layer sits beneath both models, and set the layer mode to vivid light, reducing opacity to 40%. Add lighting 2 on top of the entire image, set mode to soft light, and position until happy with the way it looks. Then duplicate the layer. This will make the lighting stronger and more vivid.

lCZL1UO.png


PNGs

Woo, PNGs! Add your roses and your lantern PNGs and resize. I used two of each, flipping the second rose PNG upside-down to cover up the left-hand model's knee.

ns2XuKj.png


Colour & Reduce Noise

To colour, I used Evey's Take Me to Church PSD, followed by Porcelain Doll from Evey's Play Pretend pack. I also used a reduce noise filter on every stock image except stock 8, using the following settings:

Strength: 9
Preserve details: 2
Reduce colour noise: 0
Sharpen details: 21

What the reduce noise filter does is give an image a blurry, oil-painting effect. Since I wanted the models, PNGs, and stock 8 to have more clarity than the rest of the image, I only applied the filter to the remaining 7 background stocks. This gave me the following effect:

VuOOsE7.png


Text & Finishing Touches

The fonts I used in this banner are Orator Std 9pt and Substrate 60pt. I created a white shadow beneath the left-hand model to help her stand out. Then I flattened the entire image and added a reduce noise filter to the whole thing, this time with these settings:

Strength: 7
Preserve details: 6
Reduce colour noise: 0
Sharpen details: 21

Finally, I added a curves adjustment, Input 86, Output 110, to brighten up the banner. And here's the final result!

Zd1V0Vy.png


I hope you managed to learn something new from this tutorial that will help you in your banner making! Good luck!! ^^​


AOmDIfy.png

Want a sparkly button of your very own?! :party: If requests are open, please fill out the form below and PM it to me and I'll get to it as soon as possible. You can request a button for whatever purpose you like! Just please don't request more than one at a time ;P

Requests are currently closed
Waiting List:

Code:
[b]Is this button just for you, or can it be used freely by everyone?:
Border shape (please use reference numbers below):
Background picture:
Colour scheme:
Text (max 20 characters):
Animation (please link me to a button with the kind of animation you'd like, or explain what you want - I can try to make it work!):
Other notes:[/b]

CaAA5ZW.png


dP1DoBv.png

These were made by request - please only use them if they were made for you!

raOIlbX.gif
Uki5nZ3.gif
DqoIxMC.gif
y4Ak9hv.gif
 
Last edited:

Users who are viewing this thread

Back
Top